
Get ready to add a dash of Whoville charm to your holiday baking! These delightful Grinch Thumbprint Cookies are not just a treat for the taste buds but also a feast for the eyes. Featuring a vibrant green chocolate filling and crowned with a festive red heart sprinkle, they are guaranteed to steal hearts, not Christmas!
Transform your kitchen into a festive wonderland with this irresistibly easy Grinch thumbprint cookies recipe. Crafted from scratch with simple ingredients and straightforward steps, these cookies are perfect for bakers of all skill levels. They’re an excellent choice for Christmas parties, a wonderful addition to cookie exchanges, or simply a charming way to spread holiday cheer among family and friends. Watch as their cheerful colors and delicious flavor bring smiles to everyone this holiday season.

What are Grinch Christmas Cookies?
Inspired by Dr. Seuss’ beloved character, the Grinch, these Christmas cookies capture the whimsical spirit of “How the Grinch Stole Christmas.” The Grinch, with his iconic green hue, is a central figure from the frosty town of Whoville. Our cookies pay homage to this character by using a striking neon green filling, symbolizing the Grinch himself. The vibrant red heart sprinkle placed atop each cookie represents his heart, which famously grew three sizes that day, making them a beautiful edible symbol of kindness and transformation during the holidays. They’re a playful and instantly recognizable treat that evokes nostalgic holiday memories for many.
Essential Ingredients for Grinch Thumbprint Cookies
Crafting these festive Grinch cookies requires a few key ingredients, each playing an important role in achieving the perfect texture and flavor. Here’s what you’ll need:
- All-Purpose Flour: You’ll need 2 cups of all-purpose flour. This forms the foundational structure of your delicious thumbprint cookie dough, ensuring a tender yet stable cookie.
- Neon Green Candy Melts: A 12-ounce bag of neon green candy melts is crucial for that signature Grinch-green center. These melt smoothly, providing a vibrant and sweet filling.
- Unsalted Butter: One cup (two sticks) of room temperature unsalted butter. Using butter at room temperature is vital for proper creaming with sugar, leading to a light and airy dough.
- Granulated Sugar: Add ⅔ cups of granulated sugar to sweeten the cookie base, balancing the flavors and contributing to a tender crumb.
- Egg Yolks: Two egg yolks are needed for the dough. They act as a binding agent, holding the ingredients together while imparting a rich flavor and golden hue to the cookies.
- Vanilla Extract: One tablespoon of vanilla extract will infuse your cookies with a warm, inviting aroma and classic flavor. High-quality vanilla can make a noticeable difference.
- Coconut Oil: You’ll need 1 tablespoon of coconut oil to help achieve a smooth, pourable consistency for your melted candy melts. It also adds a subtle hint of flavor.
- Salt: A ½ teaspoon of salt in the cookie dough enhances all the other flavors, preventing the cookies from tasting bland and bringing out their natural sweetness.
- Large Red Heart Sprinkles: These are the perfect finishing touch! Large red heart sprinkles instantly transform your cookies into recognizable Grinch masterpieces, representing his growing heart.

Step-by-Step Guide to Making Grinch Thumbprint Cookies
Follow these detailed instructions to create your own batch of charming Grinch Thumbprint Cookies:
1. Preparing the Dough
Begin by preheating your oven to 350 degrees Fahrenheit (175 degrees Celsius). Line a baking sheet with parchment paper to prevent sticking and ensure even baking. Set this aside as you prepare your dough.
In a large mixing bowl, combine the room temperature butter and granulated sugar. Use an electric hand mixer to cream these ingredients together until the mixture is light and fluffy, typically for about one minute. This step incorporates air, making your cookies tender.
Next, add the two egg yolks, ½ teaspoon of salt, and the tablespoon of vanilla extract to the creamed mixture. Continue beating with the electric mixer for another minute, ensuring all ingredients are well combined and smooth.
Gradually add the all-purpose flour to the wet ingredients. Continue mixing until the dough starts to come together and becomes crumbly. At this point, switch from the mixer to kneading by hand. Work the dough gently until it forms a cohesive, smooth ball. Over-mixing can result in tough cookies, so knead just until it’s combined.
2. Shaping and Indenting the Cookies
Take approximately 1 tablespoon of the dough and roll it between your palms to form a smooth ball, about ½ inch in size. For slightly larger cookies, you can use up to 2 tablespoons of dough, but remember these might require a slightly longer baking time.
Arrange your dough balls on the prepared baking sheet, leaving at least half an inch of space between each cookie to allow for slight spreading during baking.
Using your thumb or the back of a ¼ teaspoon measuring spoon, create an indent in the center of each dough ball. Press down firmly but gently to form a clear cavity for the filling. If you notice the edges of your cookies cracking as you make the thumbprints, simply re-roll the dough ball slightly to re-moisten the surface, then try indenting again. A smooth, well-formed indent is key for holding the generous chocolate filling.
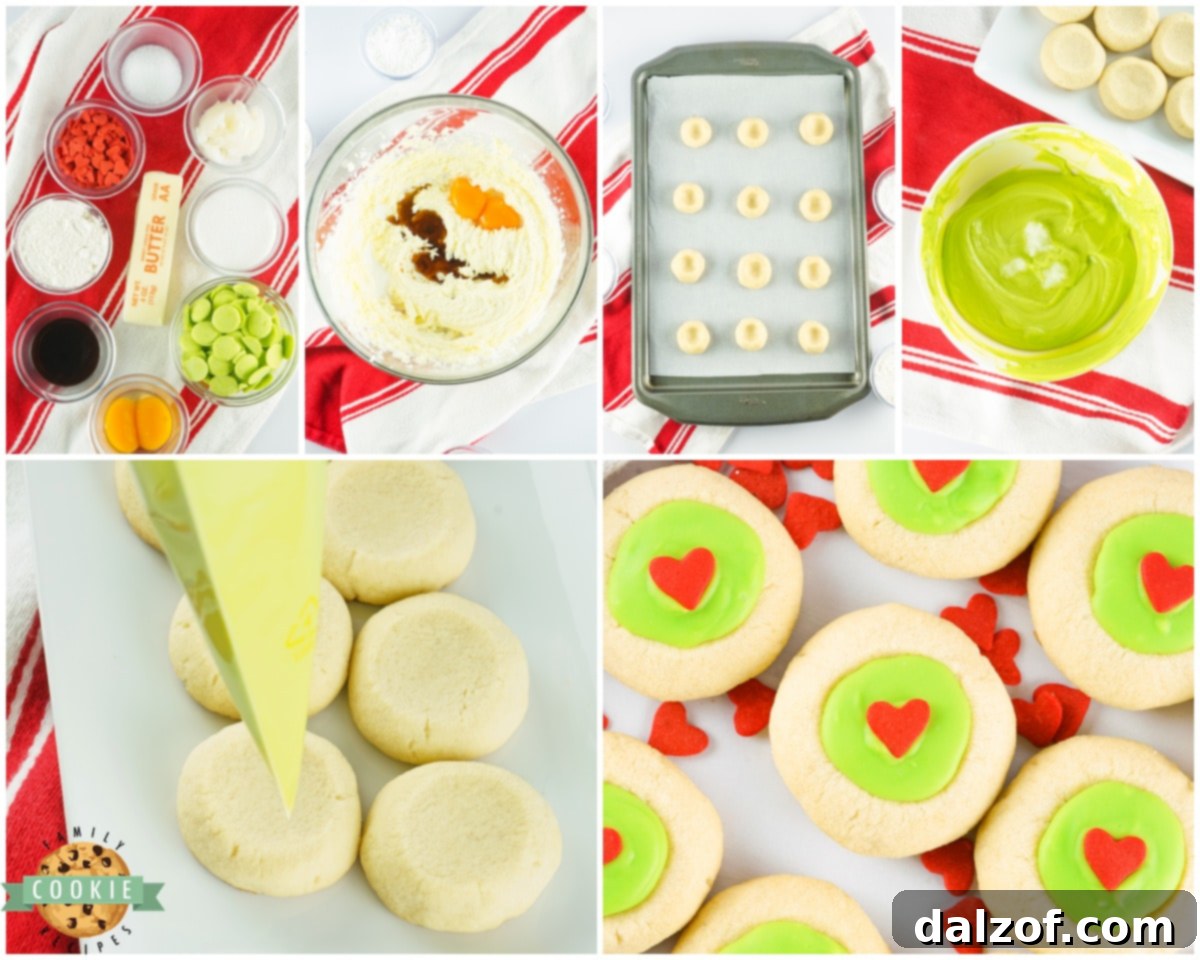
3. Baking to Perfection
Place the baking sheet with the shaped cookies into the preheated oven. Bake for 8 to 10 minutes, or until the edges and bottoms of the cookies are a very light golden brown. They should still be soft to the touch. Baking them too long can make them dry, so keep a close eye on them.
Once baked, remove the cookies from the oven and allow them to cool completely on the baking sheet. This step is crucial; attempting to fill warm cookies will cause the chocolate to melt improperly and create a messy result.
4. Crafting the Green Chocolate Filling
While the cookies are cooling, prepare your vibrant green filling. Place the neon green candy melts into a medium-sized microwave-safe mixing bowl. Microwave on high for approximately 3 minutes, stirring thoroughly after every 30 seconds. Continue microwaving and stirring until the candy melts are completely smooth and creamy, with no lumps remaining. Be careful not to overheat, as this can cause the chocolate to seize.
Add the tablespoon of coconut oil to the melted candy melts and stir vigorously until fully combined and smooth. The coconut oil helps to thin the chocolate slightly, giving it a beautiful, pourable consistency. If your chocolate still appears too thick or “gloppy,” add a tiny bit more coconut oil (½ teaspoon at a time) and stir until you achieve the desired smooth flow.
Transfer the melted green chocolate into a frosting bag (or a sturdy zip-top bag with the corner snipped). Snip a small tip off the end of the bag with scissors. Make sure the opening is small enough to control the flow, preventing the chocolate from gushing out and making it difficult to decorate cleanly.

5. Adding the Iconic Grinch Heart!
Now for the fun part! Carefully fill each cooled cookie cavity with the green chocolate. Start by piping a small amount into the middle of the indent and then work your way outwards in a circular pattern, filling to the edge. The key is to avoid overfilling. Once the chocolate has been in the cookie for 60 seconds or longer, try not to adjust it. Attempting to do so can disturb the surface and make it appear messy, a lesson learned the hard way!
After filling each cookie, gently tap the baking sheet on your countertop a few times. This helps to settle the chocolate and ensures it flattens out into a smooth, even surface.
Immediately after filling and tapping, carefully place one large red heart sprinkle directly in the middle of the green chocolate on each cookie. There’s no need to push the sprinkle in; the melting chocolate will secure it in place as it hardens.
For the chocolate to set properly, place the cookies in the refrigerator to chill for about 5 minutes, or until the green chocolate filling is firm and hardened. Once set, your delightful Grinch Thumbprint Cookies are ready to be enjoyed!

Tips for Achieving the Best Grinch Thumbprint Cookies
To ensure your Grinch Thumbprint Cookies turn out perfectly every time, keep these helpful tips in mind:
- Room Temperature Ingredients: Always use room temperature butter and egg yolks. This ensures they cream together smoothly with the sugar, creating a light and even cookie dough texture. Cold ingredients won’t emulsify properly.
- Measure Flour Correctly: For accurate baking, spoon your flour into the measuring cup and then level it off with a straight edge. Scooping directly from the bag can compact the flour, leading to too much flour and dry, crumbly cookies.
- Prevent Spreading: To keep your thumbprint cookies from spreading too much, use parchment paper or a silicone baking mat. These nonstick surfaces help maintain the cookie’s shape. Avoid greasing your baking sheets with butter or cooking spray, as added moisture can cause the cookies to spread excessively.
- Uniform Cookie Size: Use a cookie scoop or carefully measure your dough portions to ensure all cookies are roughly the same size. This promotes even baking and consistent results.
- Cool Completely: Allow your cookies to cool entirely on the baking sheet before attempting to fill them. Warm cookies will melt the candy melts, leading to a runny and messy filling.
- Piping Bag Control: When snipping the tip of your frosting bag, start with a very small cut. You can always make it larger, but you can’t make it smaller. A controlled flow is essential for neat filling.
- Gentle Tap: Don’t skip the gentle tap after filling. This small action helps the chocolate settle and smooth out beautifully, giving your cookies a professional finish.
Creative Variations for Your Grinch Cookies
While the classic Grinch design is beloved, don’t hesitate to get creative with your thumbprint cookies:
- Alternative Fillings: Instead of candy melts, consider using green white chocolate ganache (white chocolate with green food coloring), lime curd, or even green-tinted cream cheese frosting for a different texture and flavor profile.
- Different Sprinkles: If red heart sprinkles aren’t available, small red nonpareils, red sanding sugar, or even tiny green and red edible pearls can add a festive touch.
- Flavor Boosts: Add a touch of peppermint extract to the cookie dough or the green chocolate filling for a refreshing minty twist, perfect for the holiday season. Almond extract can also provide a delightful variation.
- Glazed Grinch: For a simpler look, skip the chocolate filling and instead dip the cooled cookies into a green tinted powdered sugar glaze and top with a red sprinkle.
- Whoville Swirl: For an extra artistic flair, use a toothpick to gently swirl a small amount of red-tinted melted candy melts into the green filling before it sets, creating a whimsical Whoville-inspired pattern.
Storage and Freezing Instructions for Grinch Cookies
Proper storage ensures your festive Grinch Thumbprint Cookies remain fresh and delicious for as long as possible:
- Short-Term Storage: Store these chocolate-filled thumbprint cookies in an airtight container at room temperature for up to 5 days. Ensure they are completely cooled and the chocolate filling is set before storing to prevent sticking.
- Freezing Baked Cookies: These cookies freeze beautifully! Place the completely cooled and set cookies in a single layer on a baking sheet and flash freeze for about an hour, or until firm. Then, transfer them to a freezer-safe airtight container or heavy-duty freezer bag, layering with parchment paper if needed to prevent sticking. They can be frozen for up to 3 months.
- Freezing Unbaked Dough: You can also freeze the raw cookie dough. Shape the dough into balls and make the thumbprint indentations. Arrange them on a parchment-lined baking sheet and flash freeze until solid. Then, transfer the frozen dough balls to a freezer-safe bag. When ready to bake, place frozen dough balls on a prepared baking sheet and bake for a few extra minutes (approximately 10-14 minutes), without thawing.
- Thawing Frozen Cookies: When ready to enjoy frozen cookies, simply transfer them from the freezer to an airtight container and let them thaw at room temperature. Be aware that the chocolate filling may “sweat” slightly during thawing, and this moisture could cause the red heart sprinkles’ color to bleed a little onto the green chocolate. This doesn’t affect the taste but is something to note for appearance.

Frequently Asked Questions (FAQs) About Grinch Thumbprint Cookies
- Can I use regular chocolate instead of candy melts for the green filling?
- While you can use white chocolate chips tinted with green food coloring, candy melts are recommended because they melt more smoothly and harden quickly, providing that vibrant, stable green color without seizing. If using white chocolate, ensure you use oil-based food coloring, as water-based gel or liquid colors can cause the chocolate to seize.
- Why are my thumbprint cookies cracking when I make the indent?
- Cracking usually happens if your dough is too cold or too dry. Ensure your butter is at room temperature and don’t over-flour the dough. If cracks appear, gently re-roll the dough ball in your hands to warm it slightly and make the surface more pliable before re-indenting.
- Can I make these cookies gluten-free?
- Yes, you can typically substitute the all-purpose flour with a 1:1 gluten-free baking blend that contains xanthan gum. The texture might vary slightly, but they should still turn out delicious.
- How can I make sure the red heart sprinkles stick?
- The key is to place the sprinkles immediately after filling the cookies, while the green chocolate is still wet. As the chocolate cools and hardens, it will naturally adhere to the sprinkle, keeping it firmly in place.
- Can kids help make these Grinch cookies?
- Absolutely! This recipe is fantastic for involving children. They can help with rolling the dough into balls, making the thumbprints (with supervision), and especially placing the red heart sprinkles. It’s a fun, festive activity for the whole family!
Grinch Thumbprint Cookies Recipe Card
The Grinch may have stolen Christmas but these cookies will steal your hearts! Fun & Festive Grinch Thumbprint Cookies made with green chocolate filling & topped with a red heart sprinkle!
Course: Cookies, Dessert
Cuisine: American
Keyword: Grinch Thumbprint Cookies
Prep Time: 20 minutes
Cook Time: 13 minutes
Chill Time: 5 minutes
Total Time: 38 minutes
Servings: 36 cookies
Author: Jessica & Nellie
Ingredients
- 2 Cups All-Purpose Flour
- 12 Ounces Neon Green Candy Melts
- 1 cup Unsalted Butter (2 sticks, room temperature)
- ⅔ Cup Granulated Sugar
- 2 Egg Yolks
- 1 Tablespoon Vanilla Extract
- 1 Tablespoon Coconut Oil
- ½ Teaspoon Salt
- Large Red Heart Sprinkles
Instructions
Make the Cookie Dough
- Preheat the oven to 350 degrees F (175 C) and line a standard baking sheet with parchment paper.
- In a large mixing bowl, cream together the butter and sugar using a hand mixer. Beat for 1 minute, then add in the eggs, salt, and vanilla. Beat for another minute to combine thoroughly.
- Add in the flour and continue to use the mixer until the dough turns crumbly. Switch to kneading with your hands until the mixture forms a cohesive ball.
Shape the Cookies
- Roll the dough into approximately ½-inch balls, or about 1 tablespoon worth of dough per cookie. Line them on the baking sheet, leaving about half an inch between them.
- Using your thumb or the back of a ¼ teaspoon, make a deep indent in the middle of each dough ball.
Bake the Cookies
- Bake for 8-10 minutes or until the bottoms are very lightly golden brown. Allow the cookies to cool completely on the pan before proceeding.
- Place the candy melts into a medium microwave-safe bowl and microwave for about 3 minutes, stirring every 30 seconds, until smooth and creamy.
- Add the coconut oil to the melted chocolate and stir well until fully combined and smooth.
- Place the melted green chocolate into a frosting bag and snip a small tip off with scissors.
Add the Green Thumbprint Filling & Heart!
- Fill each cookie cavity with the green chocolate, starting from the middle and working your way outwards in a circular motion to the edge of the indent.
- Give each cookie a light tap on the counter to ensure the chocolate flattens out and is smooth.
- Immediately place a red heart sprinkle in the middle of the chocolate while it is still wet.
- Chill the cookies for about 5 minutes, or until the chocolate filling has set and hardened. Enjoy your festive treats!
Nutrition Information (per serving)
Calories: 113kcal | Carbohydrates: 12g | Protein: 1g | Fat: 7g | Saturated Fat: 5g | Polyunsaturated Fat: 1g | Monounsaturated Fat: 1g | Trans Fat: 1g | Cholesterol: 24mg | Sodium: 82mg | Potassium: 11mg | Fiber: 1g | Sugar: 6g | Vitamin A: 172IU | Calcium: 4mg | Iron: 1mg
More Christmas Cookie Inspirations to Explore!
Looking for even more ways to sweeten your holiday season? Dive into our extensive collection of festive recipes and discover your next favorite Christmas cookie. From classic comforts to exciting new flavors, there’s something for everyone to enjoy. Check out our BEST CHRISTMAS COOKIE RECIPES for a treasury of holiday baking ideas!
- CHRISTMAS CUT OUT COOKIES
- HOLIDAY STAR COOKIES
- SPICED CHRISTMAS SHORTBREAD COOKIES
- CRUNCHY WHITE CHOCOLATE CINNAMON COOKIES
- CHRISTMAS SUGAR COOKIE BARS
- HOLIDAY SPICED SNICKERDOODLES
- CHRISTMAS SPRINKLE COOKIES
- CHOCOLATE PEPPERMINT COOKIES
- CHRISTMAS SUGAR COOKIE RECIPE
- CAKE MIX PEANUT BUTTER BLOSSOMS
- MINT CHRISTMAS COOKIES
- CHOCOLATE PEPPERMINT BLOSSOMS
- MINI SUGAR COOKIE BITES
- PEPPERMINT VANILLA SHORTBREAD COOKIES

I distinctly recall the day this photo was taken! My three older children were at school, leaving me with a rare, open schedule. It felt incredible. We headed to the park, despite the snow covering the ground, and I remember thinking how delightfully easy it was to navigate the park with just two little ones. Oh, those adorable faces! The boy on the right is two years younger than the girl on the left, yet he already appears taller – they grow up so fast!

You are going to absolutely adore this Grinch cookies recipe! It truly is the perfect colorful treat for the holidays, brimming with the spirit and joy of Christmas in every single delicious bite. Share them, savor them, and let the Grinch’s heartwarming transformation inspire your festive celebrations!