

Twix Cookie Cups: Your New Favorite Chocolate Caramel Dessert
Indulge in the perfect blend of chewy cookie, luscious caramel, and rich chocolate with these incredibly easy Twix Cookie Cups. This recipe transforms classic candy bar flavors into delightful, bite-sized treats that are surprisingly simple to make, thanks to a clever shortcut using refrigerated sugar cookie dough. Whether you’re a seasoned baker or just starting, these cookie cups promise a bakery-worthy dessert with minimal fuss, making them ideal for last-minute cravings, special occasions, or a delightful family treat. Get ready to impress everyone with these irresistible chocolate caramel cookie cups that capture the essence of a Twix bar in a fun, edible cup form.

Why You’ll Adore These Easy Twix Cookie Cups
These delectable cookie cups aren’t just a treat for your taste buds; they offer a variety of benefits that make them a go-to recipe for any occasion:
- Effortlessly Quick & Simple: Say goodbye to complex baking! By using pre-made sugar cookie dough, you drastically cut down on prep time, allowing you to whip up these impressive desserts in a flash. It’s the perfect solution when you need a fantastic treat without spending hours in the kitchen.
- Freezer-Friendly Convenience: Plan ahead or keep a stash for unexpected guests. These cookie cups freeze beautifully, ensuring you always have a delightful homemade dessert ready to go. Simply thaw and serve whenever the craving strikes!
- Classic Flavor Harmony: Experience the iconic trio of chocolate, caramel, and cookie in every bite. This timeless combination mimics the beloved Twix bar, delivering a satisfyingly sweet and rich experience that appeals to almost everyone.
- Customizable & Versatile: Personalize your cookie cups with optional toppings. A sprinkle of flaky sea salt elevates the flavors with a sophisticated sweet-salty contrast, while an extra drizzle of caramel sauce adds an extra layer of decadence, making each cup uniquely yours.
- The Ultimate Party Treat: Their individual, bite-sized nature makes them incredibly easy to serve and enjoy at gatherings. These crowd-pleasing desserts are guaranteed to be a hit at any party, potluck, or family get-together, leaving guests asking for the recipe.
Essential Ingredients for Crafting Your Twix Cookie Cups
Creating these delightful Twix Cookie Cups requires just a handful of simple ingredients, many of which you might already have on hand. The beauty of this recipe lies in its simplicity and the ability to use readily available items for a gourmet result.
- Sugar Cookie Dough: The foundation of our cookie cups! A 16.5-ounce tube of refrigerated sugar cookie dough is your best friend here. Brands like Pillsbury work perfectly. If you opt for pre-portioned squares, simply use your fingers to gently shape them into small circles before placing them into the muffin tin. For those who love to bake from scratch, homemade sugar cookie dough works wonderfully too; just ensure it’s soft enough to press easily into the cups.
- Soft Caramels: An 11-ounce package of soft, chewy caramels is key for that signature gooey center. Kraft caramels are a classic choice, but caramel bits offer an even quicker melting process. For a truly luxurious texture, many home bakers rave about using Werther’s Chewy Caramels, which melt into an incredibly smooth and rich filling.
- Water: Just a touch of water (about 2 tablespoons) is essential for achieving a perfectly smooth, pourable caramel consistency. It helps the caramels melt without becoming too thick or grainy, ensuring that irresistible gooey texture.
- Chocolate Chips: The final layer of decadence! Semi-sweet chocolate chips are a popular choice, providing a balanced sweetness that complements the caramel. However, feel free to use milk chocolate chips for a sweeter, creamier finish, or even dark chocolate for a richer, more intense flavor.
- Caramel Sauce (Optional Drizzle): For an extra touch of elegance and flavor, a drizzle of store-bought or homemade caramel sauce on top of the finished cookie cups adds visual appeal and another layer of caramel goodness.
- Sea Salt (Optional Sprinkle): A small pinch of flaky sea salt sprinkled over the chocolate and caramel creates a delightful contrast. This sweet-and-salty combination enhances all the other flavors, making each bite even more memorable.

Kitchen Tools You’ll Need
Gathering your tools before you start will make the baking process even smoother. Here’s what you’ll need:
- Mini muffin tin or standard cupcake/muffin tin
- Non-stick cooking spray
- Sharp knife
- Measuring spoons
- Medium mixing bowls (microwave-safe)
- Spoons (for stirring and filling)
- Wooden spoon handle or back of a teaspoon
- Serving platter
How to Make Twix Cookie Cups: A Step-by-Step Guide
Follow these simple instructions to create your own batch of homemade Twix Cookie Cups. Each step is designed for ease and delicious results!
1. Preparing Your Cookie Cups
Begin by preheating your oven to 350°F (175°C). While the oven heats, generously spray each cup of your muffin or cupcake tin with non-stick cooking spray. This crucial step prevents sticking and ensures your cookie cups come out perfectly formed.
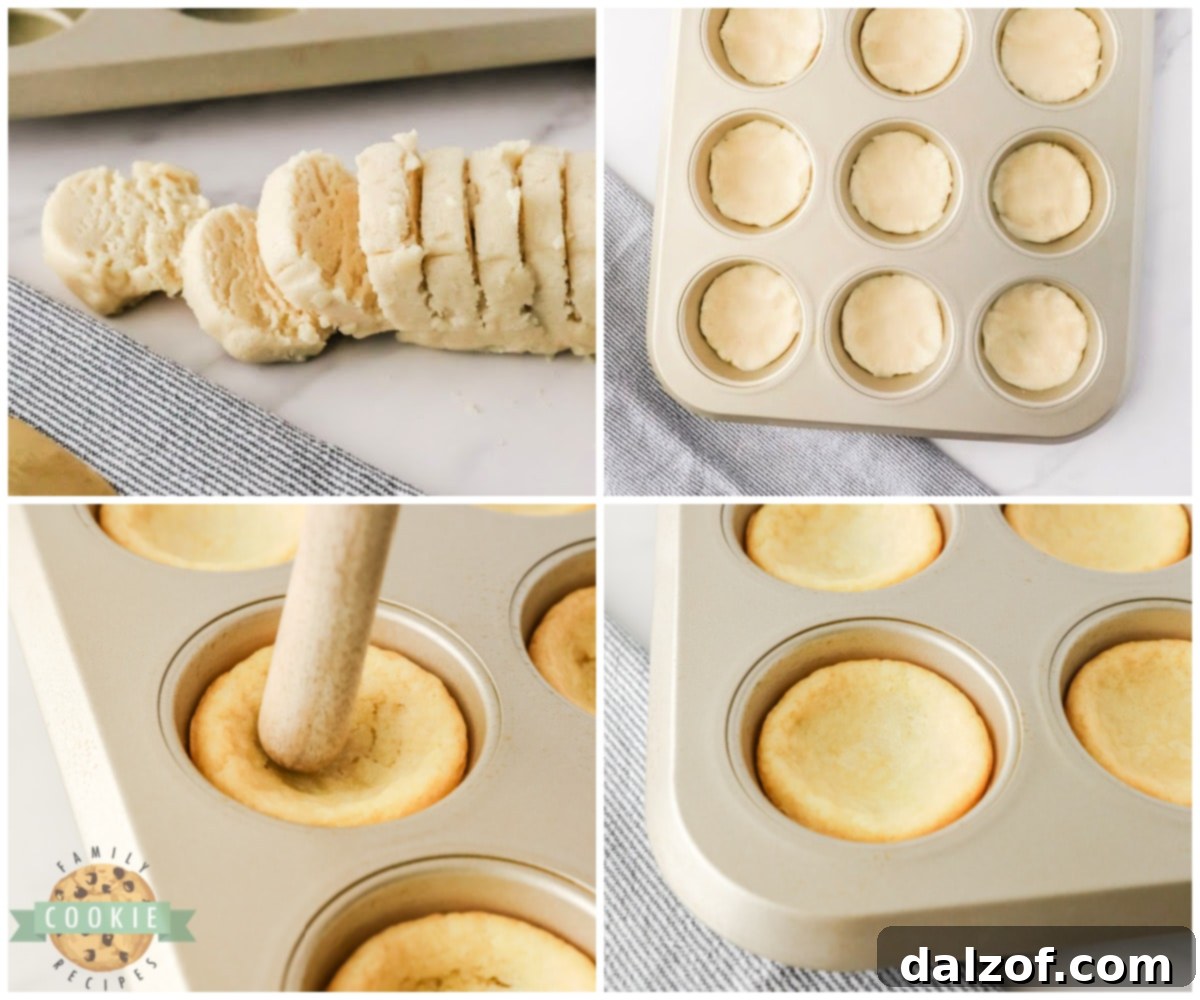
Carefully slice the refrigerated sugar cookie dough tube into ½-inch thick rounds using a sharp knife. Place one slice of dough into each prepared muffin cup. Gently press the dough down into the bottom of the cup and up along the sides to create a small, bowl-like shape. Don’t worry if it’s not perfectly even; the baking process will help it settle.
Bake the cookie cups for 10-12 minutes, or until the edges just begin to turn a light golden brown. It’s important not to overbake them to maintain a soft, chewy texture. Once baked, remove the tin from the oven and let it cool slightly for 1-2 minutes. While still warm and pliable, use the handle of a wooden spoon or the back of a teaspoon to gently press into the center of each cookie, creating a deeper well for the caramel and chocolate fillings.
2. Crafting the Gooey Caramel Layer
While your cookie cups cool slightly, prepare the luscious caramel filling. In a medium microwave-safe mixing bowl, combine the unwrapped caramels and the 2 tablespoons of water. Heat the mixture in the microwave in short 20-second increments, stirring thoroughly after each interval. Continue this process until the caramels are completely melted and the mixture is smooth and glossy. Be patient and stir well to avoid scorching.
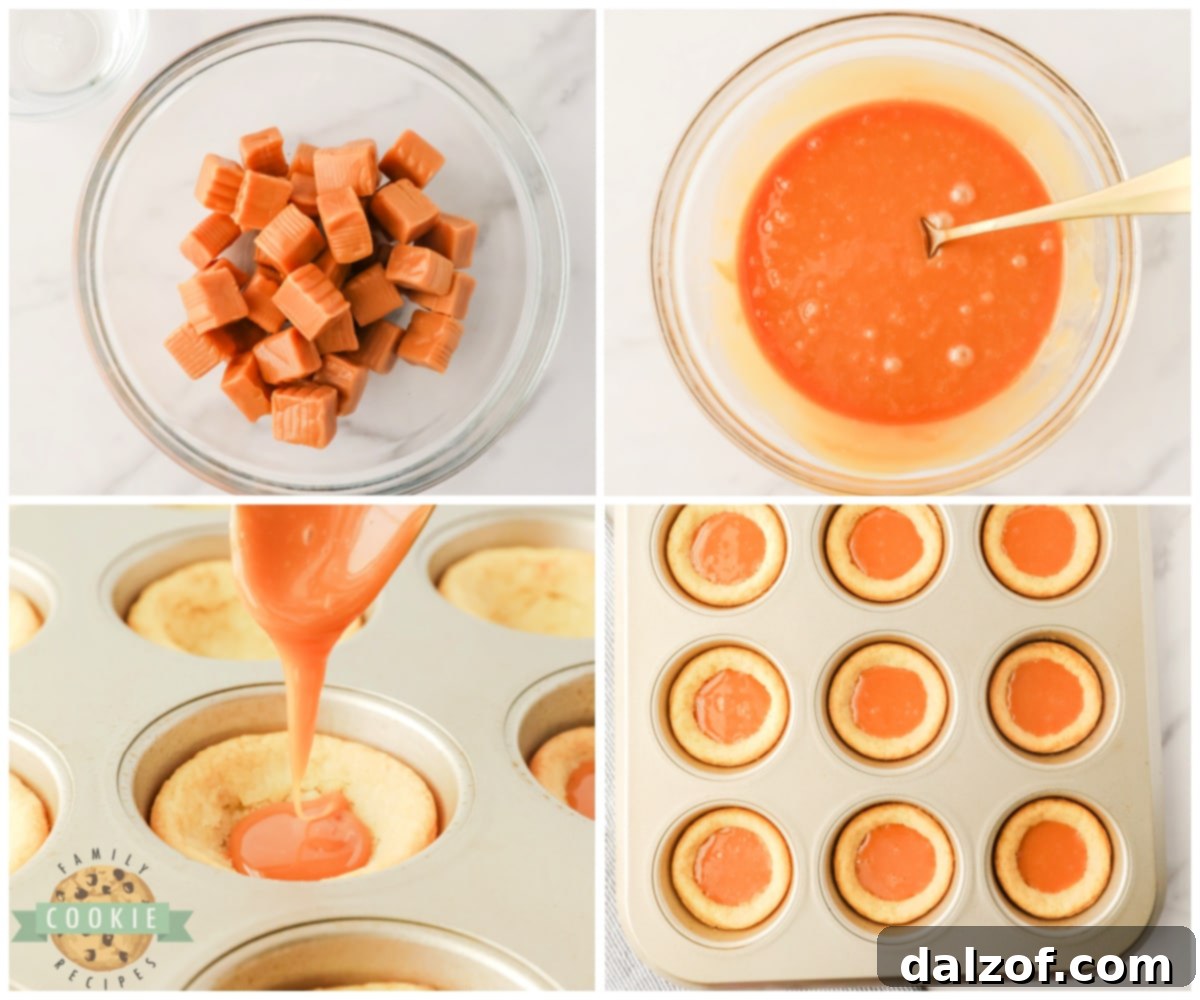
Using a spoon, carefully fill each cookie cup with the melted caramel, aiming to fill them about two-thirds full. Work relatively quickly, as caramel can start to set as it cools. Once filled, transfer the muffin tin to the refrigerator and chill for approximately 15 minutes, or until the caramel layer is firm to the touch.
3. Adding the Rich Chocolate Topping
Next, it’s time for the chocolate layer! In a separate microwave-safe bowl, melt the semi-sweet chocolate chips. Heat the chocolate in 20-second bursts, stirring diligently between each interval until the chocolate is fully melted and smooth. The stirring is crucial to prevent overheating and ensure a silky texture.
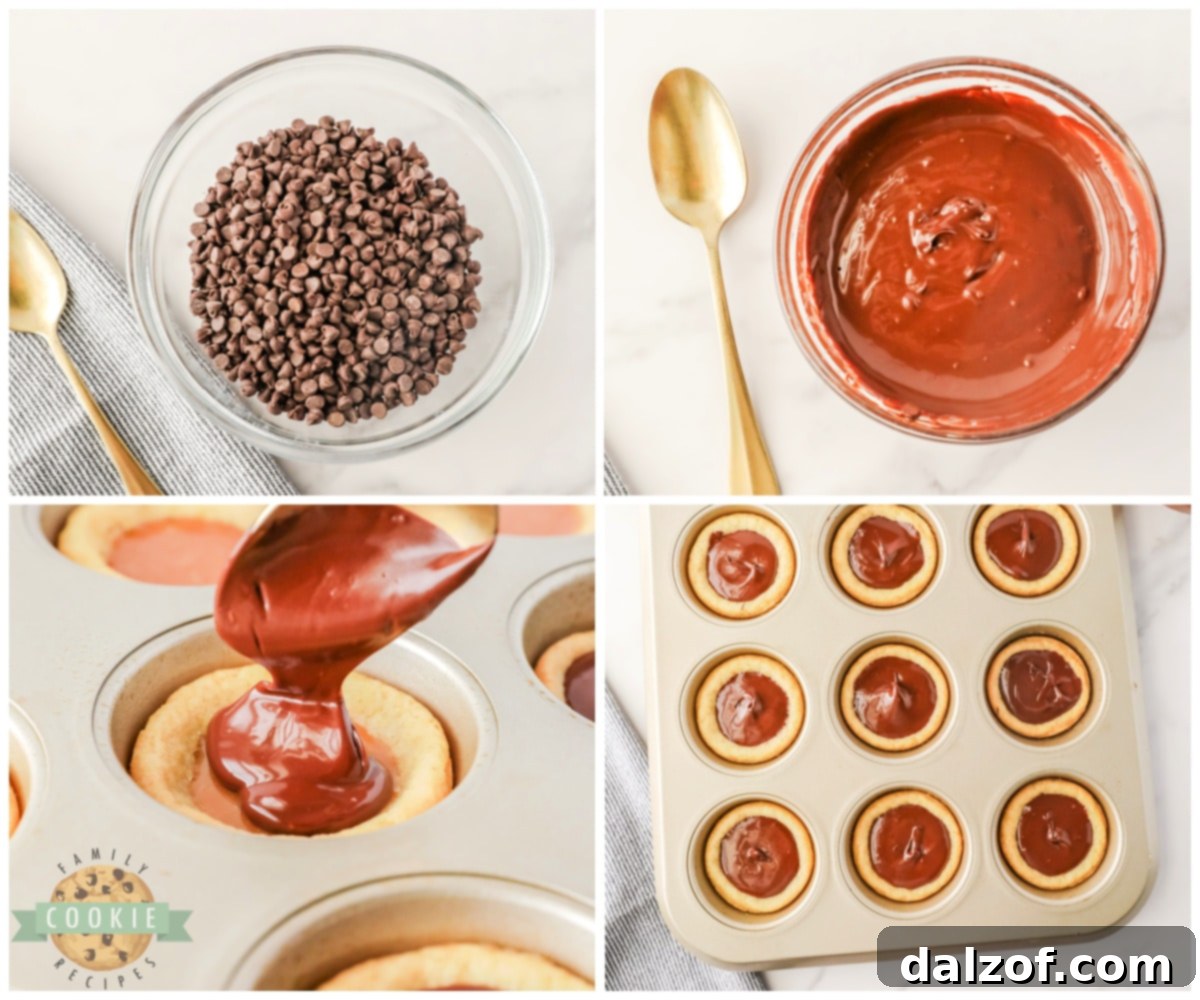
Spoon the melted chocolate over the set caramel layer in each cookie cup, filling them completely to the top. You might need to use the back of your spoon to gently spread the chocolate evenly to the edges. Once all cups are topped with chocolate, return the muffin tin to the refrigerator for another 15 minutes. This chilling period allows the chocolate to firm up, creating a satisfying snap when you bite into it.
4. Finishing Touches and Serving
Once the chocolate has completely set, it’s time to release your beautiful Twix Cookie Cups from the tin. Run a thin butter knife gently around the edges of each cookie cup to loosen it before carefully lifting them out. Their individual size makes them incredibly easy to handle and arrange.

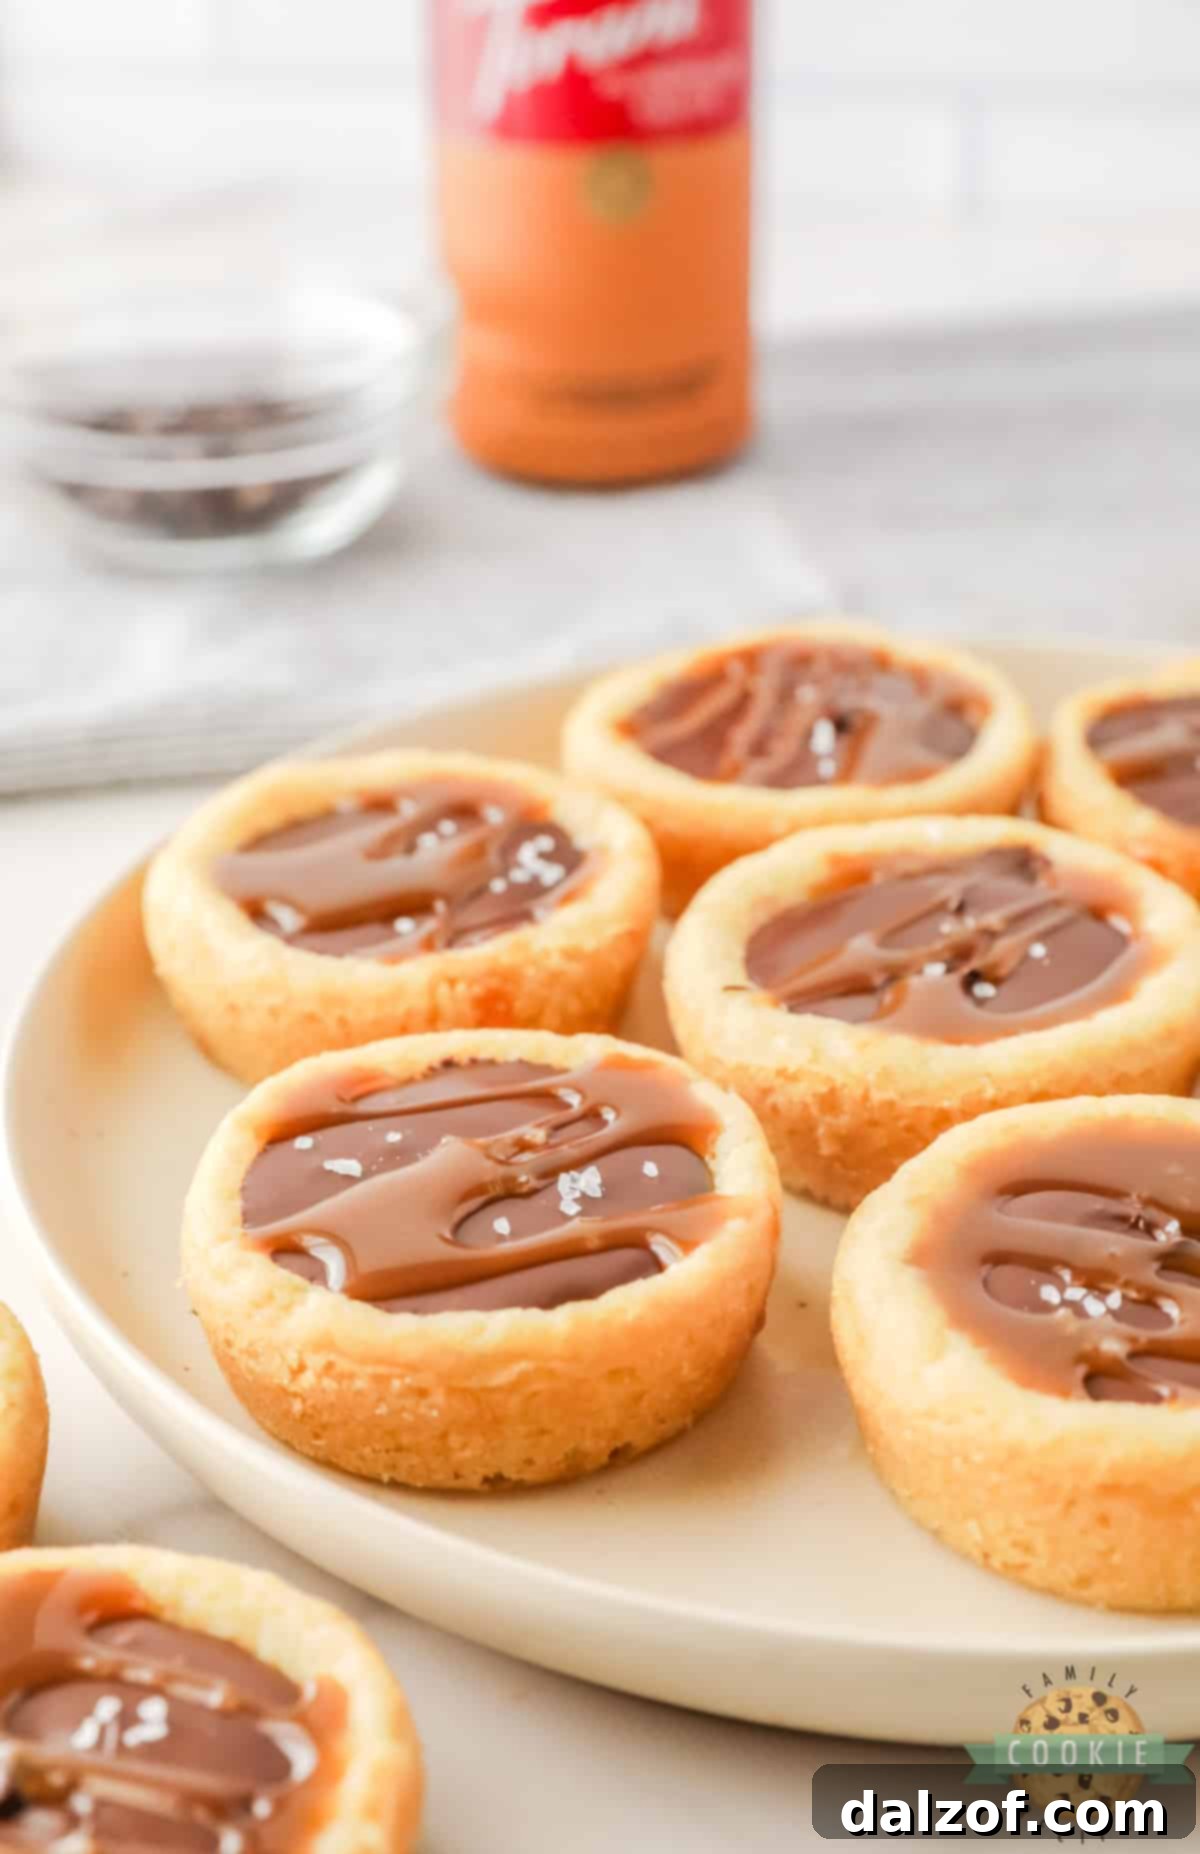
Arrange your finished cookie cups on a decorative serving dish or a flat surface. For an extra flourish, drizzle a little extra caramel sauce over each cup and sprinkle with a pinch of flaky sea salt, if desired. The contrast of the salty crunch against the sweet chocolate and chewy caramel is simply divine. Serve immediately and watch them disappear!
Expert Tips for Perfect Twix Cookie Cups
Achieving bakery-quality Twix Cookie Cups is easy with these helpful tips:
- Generous Greasing is Key: Don’t skimp on the non-stick cooking spray! A thoroughly greased muffin tin is essential for easily removing the cookie cups after they’ve cooled and set. This prevents frustrating sticking and ensures perfect shapes every time.
- Avoid Overbaking for Chewiness: Keep a close eye on your cookie cups in the oven. They should be removed when they just start to show a light golden hue around the edges. Overbaking will result in hard, crumbly cookies rather than the desired soft, chewy base.
- Work Swiftly with Caramel: Melted caramel sets quickly as it cools. Have your cookie cups ready, and once the caramel is smooth, spoon it into the cups without delay. If it starts to thicken, a quick 5-10 second reheat in the microwave can restore its pourable consistency.
- Chill Layers Separately: Allowing each layer—caramel and chocolate—to chill and set individually is crucial. This layered chilling process ensures that the caramel remains distinct and gooey beneath the firm chocolate topping, creating that perfect textural contrast.
- Consider Homemade Dough: While refrigerated dough makes this recipe super quick, don’t hesitate to use your favorite homemade sugar cookie dough. Just ensure it’s a soft, pliable dough that can be easily pressed into the muffin tin cups without cracking.
- Temperature Control for Chocolate: When melting chocolate, use short intervals and stir continuously. Overheating chocolate can cause it to seize or become grainy. If it seems too thick, a tiny bit of coconut oil or shortening can help smooth it out.

Storage & Freezing Instructions
These Twix Cookie Cups are fantastic for making ahead and storing, ensuring you always have a delightful treat on hand.
- Room Temperature: For immediate enjoyment, store your Twix Cookie Cups in an airtight container at room temperature for up to 3 days. While they remain delicious, the chocolate and caramel might soften slightly, especially in warmer environments.
- Refrigerator: To maintain the firm texture of the chocolate and caramel layers, store the cookie cups in an airtight container in the refrigerator for up to 5 days. This is often preferred for a crisp bite and to prevent any melting.
- Freezer: Twix Cookie Cups are exceptionally freezer-friendly, making them perfect for meal prepping desserts or stocking up for future cravings. Place them in an airtight container with parchment paper separating the layers to prevent sticking. They can be frozen for up to 2 months. To serve, simply thaw them at room temperature for about 30-60 minutes, or enjoy them slightly chilled for a firmer bite.

TWIX COOKIE CUPS RECIPE
Twix Cookie Cups are incredibly easy to make with pre-made cookie dough, soft caramels, and rich chocolate chips! This recipe requires only a few ingredients to create these delicious chocolate caramel cookie cups, perfect for any occasion.
- Course: Cookies
- Cuisine: American
- Keyword: Twix Cookie Cups, Chocolate Caramel Cookies
- Prep Time: 10 minutes
- Cook Time: 10 minutes
- Chill Time: 30 minutes
- Servings: 16 cookie cups
- Calories: 267 kcal
- Author: Jessica & Nellie
Ingredients
- 1 16.5 oz tube refrigerated sugar cookie dough (e.g., Pillsbury)
- 11 oz pkg of soft caramels (e.g., Kraft or Werther’s Chewy)
- 2 Tbsp water
- 1 cup semi-sweet chocolate chips (or milk chocolate)
- Caramel sauce (optional, for drizzling)
- Sea salt (optional, for sprinkling)
Instructions
- Preheat oven to 350°F (175°C). Generously spray the cups of a cupcake/muffin tin with non-stick cooking spray.
- MAKE THE COOKIE CUPS: Use a sharp knife to slice the dough into ½ inch thick slices. Place each slice of dough into individual cups, pressing dough into the bottom and up the sides to form a cup.
- Bake for 10-12 minutes or until just beginning to turn a light golden brown. Remove from heat and allow to cool slightly (1-2 minutes).
- Using the handle of a wooden spoon or the back of a teaspoon, press lightly into the dough in a circular motion to form the cookie cups.
- MAKE THE CARAMEL: In a medium mixing bowl, add caramels and water. Heat in the microwave in 20-second increments, stirring frequently, until fully melted and smooth.
- Using a spoon, add caramel to the cookie cups, filling about ⅔ full. Place in the fridge for 15 minutes or until caramel is set.
- MELT THE CHOCOLATE: In another bowl, melt chocolate chips in the microwave. Heat in 20-second increments until fully melted, stirring between each interval until smooth.
- Spoon the melted chocolate onto the top of the cookie cups, filling completely. You may need to use the back of the spoon to spread the chocolate to the edges. Place in the fridge for another 15 minutes to allow the chocolate to set.
- TOP AND SERVE: Remove cookie cups gently, using a butter knife to lift from the tin.
- Arrange on a serving dish or flat surface. Drizzle caramel sauce over each cookie cup and top with a pinch of sea salt, if desired, before serving.
Nutrition
Calories: 267kcal | Carbohydrates: 39g | Protein: 3g | Fat: 12g | Saturated Fat: 5g | Polyunsaturated Fat: 2g | Monounsaturated Fat: 5g | Trans Fat: 0.01g | Cholesterol: 5mg | Sodium: 134mg | Potassium: 148mg | Fiber: 1g | Sugar: 28g | Vitamin A: 25IU | Vitamin C: 0.1mg | Calcium: 36mg | Iron: 1mg
Frequently Asked Questions (FAQs) About Twix Cookie Cups
Here are answers to some common questions about making these delightful chocolate caramel cookie cups:
Can I use homemade cookie dough instead of store-bought?
Absolutely! Homemade sugar cookie dough works wonderfully for this recipe. Just make sure your dough is on the softer side, making it easier to press evenly into the muffin tin cups without tearing or cracking. If it’s too firm, let it sit at room temperature for a few minutes to soften.
How do I keep the caramel from getting too hard?
The key to chewy caramel is not to overcook it. Be sure to add the recommended amount of water (2 tablespoons) when melting the caramels, as this helps create a smoother, softer consistency. Heat in short bursts in the microwave and stir frequently. Once chilled, the caramel should remain delightfully chewy, not rock hard.
What’s the best way to remove cookie cups from the pan?
Allow the cookie cups to cool completely, especially after the chocolate layer has set in the fridge. Then, use a thin butter knife to gently loosen the edges of each cup from the tin. A generous coating of non-stick cooking spray before baking is also vital for easy release.
Can I freeze Twix Cookie Cups?
Yes, they freeze beautifully! Place the cooled and set cookie cups in an airtight container, using parchment paper between layers to prevent them from sticking together. They can be stored in the freezer for up to 2 months. Thaw them at room temperature for about 30-60 minutes before serving for the best texture.
Can I make these in advance for a party?
These are perfect for making ahead! You can prepare the Twix Cookie Cups 1–2 days in advance and store them in an airtight container in the refrigerator. For the freshest look and taste, add any optional caramel drizzle and sea salt just before you plan to serve them.
Delicious Variations to Explore
While the classic Twix Cookie Cup is a masterpiece on its own, feel free to get creative with these delicious variations:
- Different Cookie Base: Experiment with other refrigerated cookie dough flavors. Peanut butter cookie dough would create a fantastic chocolate-caramel-peanut butter combination, or a chocolate cookie dough for a double chocolate experience.
- Chocolate Choices: Instead of semi-sweet, try milk chocolate for a sweeter profile, dark chocolate for a richer flavor, or even white chocolate for a different aesthetic and taste. You could also use chopped chocolate bars for a more artisanal touch.
- Nutty Additions: Before the chocolate sets, sprinkle a few chopped peanuts, pecans, or almonds on top for added crunch and flavor, enhancing the candy bar feel.
- Spice It Up: A tiny pinch of cinnamon or a dash of vanilla extract added to the melted caramel can introduce subtle warmth and complexity.
- Mini Candy Bar Pieces: For an ultimate Twix experience, finely chop a Twix bar and sprinkle the pieces over the melted chocolate before it sets.
Other Twix-Inspired Recipes You’ll Adore
If you can’t get enough of that wonderful chocolate and caramel combination, explore these other fantastic Twix-themed recipes:
- Twix Cookie Bites: These are a fantastic no-bake treat featuring Nilla wafers, Rolos, and almond bark, perfectly capturing the classic Twix chocolate-caramel flavor in a quick, pop-in-your-mouth format.
- Twix Cookie Bars: A homemade dessert that’s simple to prepare and excellent for serving a crowd, featuring a buttery shortbread base topped with gooey caramel and a rich chocolate layer.
- No-Bake Twix Pie: With just 5 minutes of prep, this decadent dessert combines a buttery crust, a creamy filling, and plenty of Twix bars for an incredibly easy and satisfying treat.
- No-Bake Twix Cake: Layers of vanilla cookie crust, luscious creamy pudding, and crunchy Twix pieces create a delightful sweet-and-salty candy bar dessert that everyone is sure to love.
These Twix Cookie Cups are truly the ultimate shortcut dessert, offering soft, chewy cookie bases generously filled with rich caramel and decadent chocolate. They provide a delightful, bite-sized version of your favorite candy bar, perfect for sharing, celebrating, or simply indulging yourself. Enjoy the ease and deliciousness!