
Indulge in the festive spirit with our irresistible Peppermint Chocolate Sandwich Cookies! These delightful holiday treats feature soft, rich chocolate cookies embracing a creamy, dreamy peppermint cheesecake filling. Perfect for sharing, gifting, or making any dessert tray shine, these cookies are a guaranteed crowd-pleaser that capture the essence of winter wonder in every bite.

As winter approaches and the holiday season twinkles, there’s nothing quite like a homemade treat to warm the heart. These exquisite Peppermint Chocolate Sandwich Cookies are more than just a dessert; they’re an experience. Imagine a deeply flavored chocolate cookie, perfectly soft and chewy, paired with a vibrant, refreshing, no-bake peppermint cheesecake filling. Each cookie is then artfully rolled in crunchy peppermint candies, creating a visual and textural masterpiece that evokes the comfort of a steaming cup of hot cocoa. This recipe is designed to yield several dozens, ensuring you have plenty to share at your next cookie exchange, Christmas party, or simply to keep your own holiday cookie jar delightfully stocked.
What Are Peppermint Chocolate Sandwich Cookies?
At their core, Peppermint Chocolate Sandwich Cookies are a harmonious blend of classic holiday flavors and satisfying textures. They consist of two distinct elements: a rich, dark chocolate cookie base and a luscious, cool peppermint cheesecake filling. The magic truly happens when these two components are brought together, with the addition of a crunchy, crushed peppermint candy coating. The soft, tender chocolate cookie provides a robust cocoa foundation, while the creamy, tangy, and sweet peppermint cheesecake filling introduces a refreshing contrast. The final roll in crushed peppermints adds an extra layer of minty flavor and an enticing crunch, making these cookies an unparalleled holiday indulgence. Every bite delivers a symphony of dark chocolate, sweet creaminess, and invigorating peppermint, reminiscent of your favorite winter candies and beverages.

Why You’ll Adore These Holiday Cookies
- Irresistible Flavor Combination: The timeless pairing of rich chocolate and cool peppermint is elevated in these cookies, offering a balanced and deeply satisfying taste profile.
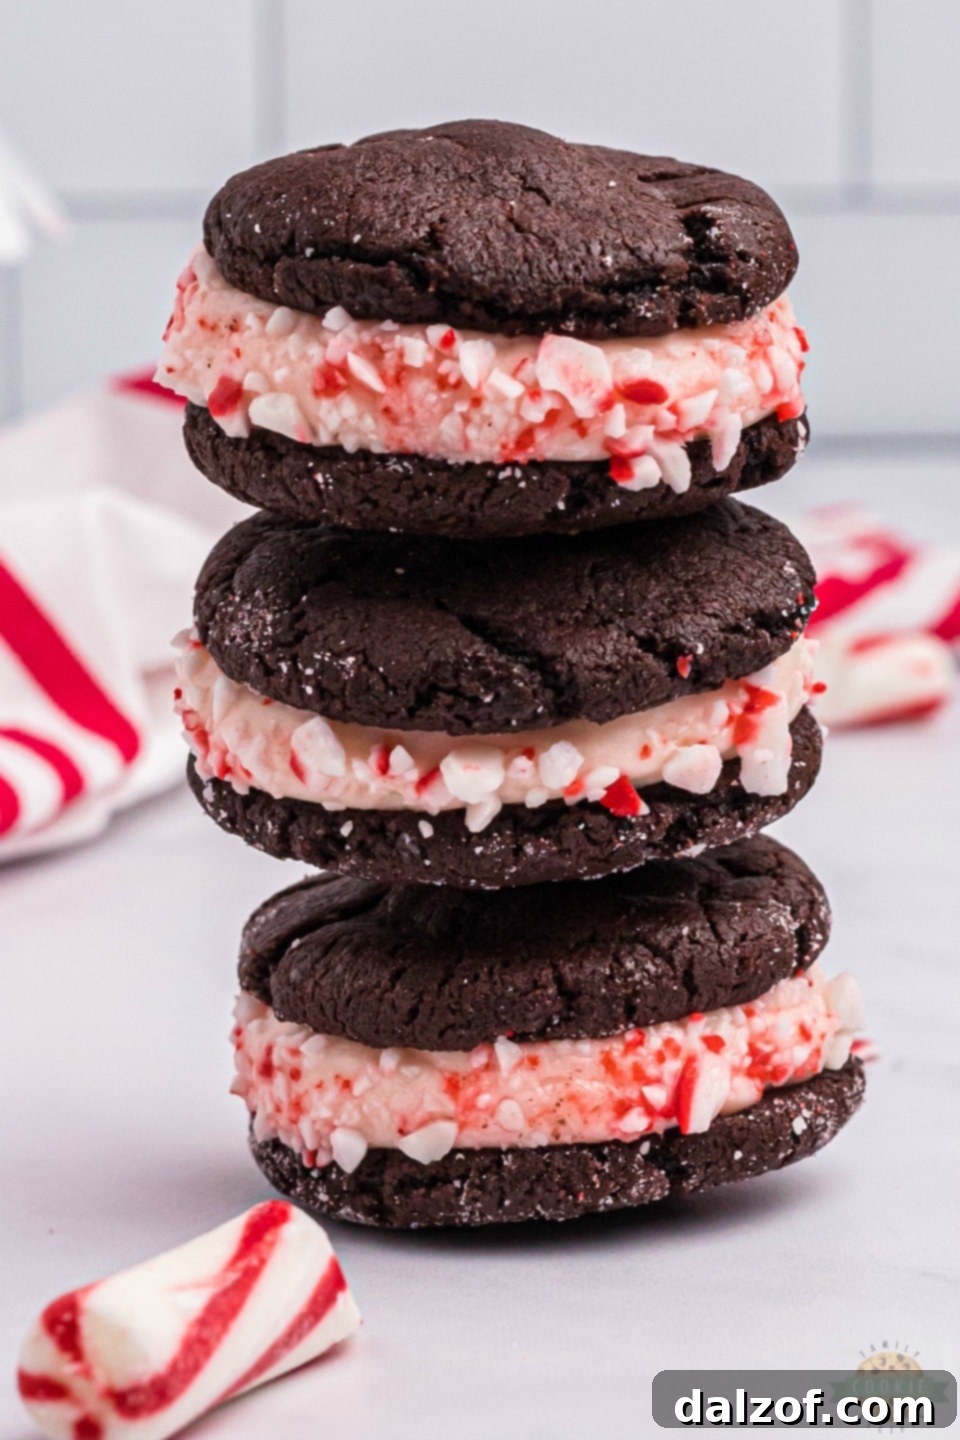
- Stunning Presentation: With their dark chocolate exterior, creamy pink filling, and vibrant peppermint candy edges, these cookies are as beautiful to look at as they are delicious to eat, making them perfect for holiday tables and gift boxes.
- Perfect Holiday Gift: Handmade cookies are a thoughtful gesture. These sandwich cookies package beautifully and make wonderful gifts for neighbors, teachers, friends, and family.
- Crowd-Pleasing Dessert: Whether you’re hosting a Christmas party, attending a cookie exchange, or simply looking for a festive treat, these cookies are guaranteed to be a hit with everyone.
- Satisfying Texture Play: Enjoy the contrast between the soft, chewy chocolate cookie, the smooth and creamy cheesecake filling, and the delightful crunch of crushed peppermint candies.
- Make-Ahead Friendly: Both the cookies and the filling can be prepared in advance, simplifying your holiday baking schedule.
Essential Ingredients for Peppermint Chocolate Sandwich Cookies
Crafting these heavenly cookies requires a careful selection of ingredients, each playing a crucial role in achieving the perfect flavor and texture. We’ll break down the components for both the decadent chocolate cookies and the refreshing no-bake peppermint cheesecake filling.
For the Rich Dark Chocolate Cookies:
- All-Purpose Flour: You’ll need 1 1/4 cups of all-purpose flour. This forms the structural base of our cookies, providing the necessary body and chewiness.
- Dutch-Processed Cocoa Powder: A generous 1/2 cup of Dutch-processed cocoa powder is essential for that deep, dark chocolate flavor and color. Unlike natural cocoa, Dutch-processed cocoa is less acidic, resulting in a smoother, milder chocolate taste. Brands like Hershey’s Special Dark are excellent choices for achieving that intense cocoa profile.
- Baking Soda: 1 teaspoon of baking soda acts as a leavening agent, helping the cookies to rise slightly and achieve a tender, pillowy texture during baking. It reacts with the acidic components in the dough (even Dutch-processed cocoa has some acidity) to create a light lift.
- Salt: Just 1/8 teaspoon of salt is a vital flavor enhancer. It balances the sweetness, deepens the chocolate notes, and makes all the other flavors truly pop. Don’t skip it!
- Unsalted Butter: One stick (1/2 cup) of unsalted butter, softened to room temperature, is crucial for adding richness, moisture, and a tender crumb to the cookies. Room temperature butter creams beautifully with sugar, incorporating air for a light texture.
- Granulated Sugar: We use 3/4 cup of granulated sugar to provide sweetness and contribute to the crisp edges of the cookies.
- Dark Brown Sugar: 1/4 cup of dark brown sugar adds depth of flavor with its molasses notes and ensures a wonderfully chewy cookie texture. The moisture in brown sugar helps keep the cookies soft.
- Large Egg: A single large egg serves as the primary binder in our cookie dough, holding all the ingredients together and contributing to the cookie’s structure and moisture. Ensure it’s also at room temperature for better incorporation.
- Pure Vanilla Extract: 1 teaspoon of pure vanilla extract enhances the overall flavor profile, complementing the chocolate and adding a warm, aromatic note. Using a high-quality vanilla can make a noticeable difference in the final taste.

For the Dreamy No-Bake Peppermint Cheesecake Filling:
- Cream Cheese: Two 8-ounce blocks (16 ounces total) of full-fat cream cheese are the star of our rich and tangy filling. It’s imperative that the cream cheese is at room temperature to ensure a smooth, lump-free mixture.
- Marshmallow Fluff: One small jar (7 ounces) of marshmallow fluff is the secret to achieving that sweet, incredibly light, and fluffy texture in our filling. It adds sweetness and a wonderful airy quality without needing to whip egg whites.
- White Chocolate Chips: 1/4 cup of white chocolate chips, melted and then cooled to room temperature, adds a subtle sweetness, richness, and helps stabilize the filling, giving it a firmer consistency.
- Peppermint Extract: 2 teaspoons of peppermint extract are vital for that refreshing mint flavor. Be sure to use peppermint extract, not spearmint or regular mint, as peppermint offers a distinctively strong and cool taste that defines this cookie.
- Crushed Peppermint Candies: You’ll need about 1 cup of crushed peppermint candies. These are incorporated into the filling itself, adding tiny bursts of minty crunch and a lovely pink hue, and an additional amount will be used for rolling the finished cookies for a truly festive flourish.
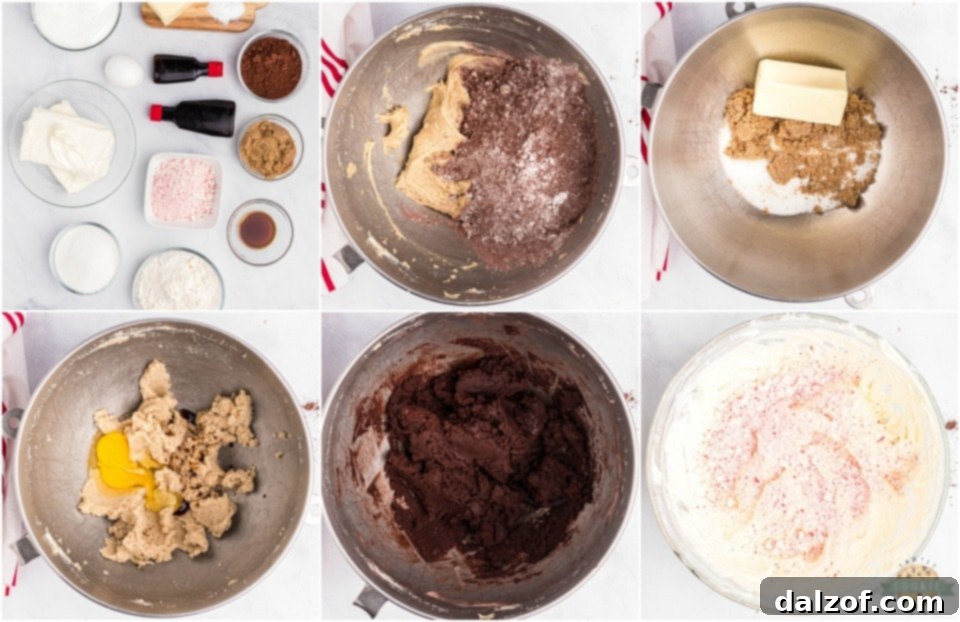
Crafting Your Peppermint Chocolate Sandwich Cookies: A Step-by-Step Guide
Follow these detailed instructions to create your perfect batch of holiday cookies. Remember, patience in cooling and chilling is key to sandwich cookie success!
Part 1: Preparing the Dark Chocolate Cookies
- Combine Dry Ingredients: In a medium-sized bowl, thoroughly whisk together the all-purpose flour, Dutch-processed cocoa powder, baking soda, and salt. Set this mixture aside for later. This ensures all the leavening agents and flavor enhancers are evenly distributed.
- Cream Butter and Sugars: In a separate, larger mixing bowl (or the bowl of a stand mixer fitted with the paddle attachment), cream together the softened butter, granulated sugar, and dark brown sugar. Beat on medium speed until the mixture is light, fluffy, and pale in color, usually 2-3 minutes. This step incorporates air, which is essential for a tender cookie.
- Add Wet Ingredients: Incorporate the large egg and pure vanilla extract into the creamed butter and sugar mixture. Continue mixing until everything is just combined, scraping down the sides of the bowl as needed. Avoid overmixing at this stage.
- Gradually Add Dry Mixture: With your mixer set to the lowest speed, slowly add the reserved cocoa and flour mixture to the wet ingredients. Mix only until just combined and no streaks of dry flour remain. The cookie dough will be quite stiff and dense, which is perfectly normal for this type of cookie.
- Chill the Dough (Optional but Recommended): For cookies with a bit more loft and a thicker texture, cover the dough and refrigerate it for at least 30 minutes, or even longer. Chilling prevents the cookies from spreading too much during baking. If you prefer thinner cookies, similar to classic sandwich cookie wafers, you can use the dough at room temperature immediately after mixing.
- Shape the Cookies: Using a tablespoon-sized scoop (or a small ice cream scoop for larger cookies), roll the dough into uniform balls. Place these dough balls onto a prepared baking sheet, ensuring they are spaced approximately 2 inches apart to allow for slight spreading.
- Bake to Perfection: Preheat your oven to 350°F (175°C). Bake the cookies for 7-8 minutes. Keep a close eye on them; you want them to be set around the edges but still slightly soft in the center. Overbaking will result in a dry cookie, so err on the side of underbaking if unsure.
- Cool Completely: Once baked, transfer the cookies to a wire rack to cool completely. It’s crucial that the cookies are fully cooled before you begin filling them; otherwise, the filling will melt and run.

Part 2: Crafting the No-Bake Peppermint Cheesecake Filling
- Beat Cream Cheese and Marshmallow Fluff: In a medium-sized mixing bowl (or using a stand mixer), combine the room temperature cream cheese and marshmallow fluff. Beat on medium-high speed until the mixture is completely smooth, airy, and free of any lumps. This may take 2-3 minutes.
- Incorporate White Chocolate: Add the melted and cooled white chocolate chips to the cream cheese mixture. Continue blending until well incorporated and smooth. The white chocolate adds a subtle sweetness and helps to firm up the filling.
- Add Peppermint Extract: Pour in the peppermint extract and blend again until the minty flavor is evenly distributed throughout the filling.
- Fold in Crushed Peppermint: Gently fold in the crushed peppermint candies. As you mix, the candies will infuse the filling with beautiful specks of red and a delicate pink hue. If you desire a deeper pink color, you can add a drop or two of red food coloring at this stage.
- Prepare for Piping: For easy and neat assembly, transfer your prepared filling into a large pastry piping bag fitted with a round tip, or simply snip a corner off a gallon-sized plastic bag with a zipper top.
Part 3: Assembling Your Peppermint Chocolate Sandwich Cookies
- Pair and Flip Cookies: Select cooled cookies and pair them up by similar size. Turn half of the cookies upside down so their flat bottoms are facing up.
- Pipe the Filling: Pipe a generous dollop of the peppermint cheesecake filling onto the center of each inverted cookie.
- Top with Second Cookie: Gently place a second cookie on top of the filling, pressing down lightly until the filling spreads gracefully to the edges, creating a perfect sandwich.
- Add Festive Decoration (Optional): For an extra festive touch, roll the edges of your assembled cookies in additional crushed peppermint candies or your favorite holiday sprinkles. This adds visual appeal and an extra textural element.
- Chill to Set: Arrange the assembled cookies in a single layer in a loosely covered cake pan or any deep container. Refrigerate for a minimum of 2 hours. This chilling period allows the filling to set properly and also allows the cookies to soften slightly from the moisture in the filling, achieving that ideal sandwich cookie texture.
Tips for Peppermint Chocolate Sandwich Cookie Perfection
- Room Temperature Ingredients: Ensure your butter, egg, and especially the cream cheese are at proper room temperature. This is crucial for a smooth, homogenous dough and filling without lumps.
- Don’t Overmix: When adding dry ingredients to wet, mix only until just combined. Overmixing can develop the gluten in the flour, leading to tough cookies.
- Uniform Cookie Size: Using a cookie scoop helps ensure all your cookies are the same size, which is essential for pairing them up into neat sandwich cookies.
- Cool Completely: Patience is key! Make sure your chocolate cookies are entirely cool before adding the cheesecake filling. Warm cookies will melt the filling.
- Peppermint Extract vs. Mint Extract: Always use peppermint extract for that distinct cool, sharp mint flavor. Other mint extracts might yield a different taste profile.
- Adjusting Cookie Thickness: If you prefer thicker, chewier cookies, definitely chill your dough for at least 30 minutes. For a flatter, more crisp sandwich cookie, you can bake the dough at room temperature.
- Piping Bag for Easy Filling: While you can spread the filling with a spoon, a piping bag makes the assembly process much cleaner, faster, and ensures a consistent amount of filling in each cookie.
Storing Your Peppermint Chocolate Sandwich Cookies
Once filled, these Peppermint Chocolate Sandwich Cookies should be treated like any cheesecake-based dessert. Store them in an airtight container in the refrigerator for up to one week. Beyond this timeframe, the cookies will tend to become very soft due to the moisture from the filling, though they will still be delicious. If you prefer to bake the cookies and prepare the filling in advance but assemble later, the baked chocolate cookies can be stored in an airtight container at room temperature, while the cheesecake filling should be kept covered in the fridge.
Can You Freeze Peppermint Chocolate Sandwich Cookies?
Yes, absolutely! These delicious cookies freeze wonderfully, allowing you to prepare them well in advance of your holiday festivities. You can freeze them for up to two months. However, there’s a crucial tip: I highly recommend NOT rolling them in the crushed peppermint candies until after they have thawed. The candies tend to absorb moisture during freezing and thawing, which can make them sticky, messy, or cause them to dissolve. Instead, freeze the plain assembled sandwich cookies in an airtight container or freezer bag. When you’re ready to serve, simply thaw them in the refrigerator, and then roll them in fresh crushed peppermint candies for that perfect, crisp finish just before serving.

Frequently Asked Questions
Q: Can I use regular mint extract instead of peppermint?
A: While you could, we highly recommend sticking with peppermint extract. Peppermint has a distinct, strong, and cool flavor that is characteristic of holiday mints. Regular mint extract might offer a milder, sometimes spearmint-like flavor that won’t quite deliver the festive punch you’re looking for in these cookies.
Q: My cookie dough is too stiff to scoop. What should I do?
A: The dough for these chocolate cookies is naturally quite stiff, especially if it’s been chilled. If it’s too difficult to scoop, let it sit at room temperature for 5-10 minutes to soften slightly. If it’s still too firm, you can knead it briefly with your hands, which will warm it up. Don’t add extra liquid to the dough.
Q: Can I make the cookies or filling ahead of time?
A: Yes! You can bake the chocolate cookies up to 3-4 days in advance and store them in an airtight container at room temperature. The peppermint cheesecake filling can also be made 2-3 days ahead and stored in an airtight container in the refrigerator. Assemble the cookies the day before or the day of serving for the best texture.
Q: What if my cheesecake filling isn’t firm enough?
A: Ensure your cream cheese was at room temperature but not warm, and that your melted white chocolate was cooled completely before adding. The chilling step after assembly is critical for the filling to firm up. If it’s still too soft after several hours in the fridge, try chilling it for longer, or for a quick fix, pop it into the freezer for 15-20 minutes before serving.
Q: How can I make these cookies bite-sized?
A: To create smaller, bite-sized sandwich cookies, use about 1 to 1.5 teaspoons of cookie dough for each individual cookie. Bake them for a slightly shorter time, around 6-7 minutes. The most important thing is to make sure you have uniform sizes for pairing.


We hope you love these Peppermint Chocolate Sandwich Cookies as much as we do! They bring joy and a burst of holiday cheer to any gathering. Don’t hesitate to get the whole family involved in the baking and assembly process—it’s a wonderful way to create lasting holiday memories. These cookies truly embody the festive spirit, making them a staple in our holiday baking traditions.

Discover More Delightful Recipes!
If you enjoyed these festive treats, you’re in for more culinary adventures. Explore our other beloved cookie recipes that are perfect for any occasion:
- Caramel Apple Oatmeal Cookies
- Loaded Reese’s Cookies
- Butterscotch Pretzel Cookies
- Apple Pumpkin Oatmeal Cookies
- Caramel Chocolate Crinkle Cookies
- Chocolate Shortbread Cookies
- M&M Halloween Cookies
- Spiced Apple Cookies
- Sour Cream Sugar Cookies
- S’Mores Cookies
- Surprise Chocolate Kiss Cookies
- Buckeye Cookies
- Lemon Slice and Bake Cookies
- Banana Oatmeal Cookies
- Cinnamon Chocolate Crinkle Cookies
We’re passionate about bringing delicious, easy-to-follow recipes to your kitchen, creating moments of joy and connection through the simple act of baking. Happy baking, and happy holidays!