
Craving a delightful treat that perfectly marries rich chocolate with cool, refreshing mint? Look no further than these incredible Chocolate Mint Cookies! Imagine sinking your teeth into a soft, chewy chocolate cookie, only to discover a smooth, luscious York peppermint patty tucked right in the middle. This isn’t just an easy cookie recipe; it’s a culinary experience, offering the ultimate balance of deep cocoa flavor and invigorating peppermint.
These cookies are more than just a dessert; they’re a celebration of a classic flavor combination that appeals to almost everyone. Perfect for holiday gatherings, a cozy night in, or just a special everyday indulgence, these homemade chocolate mint cookies are guaranteed to become a new favorite in your recipe collection. Get ready to impress your family and friends with a treat that looks as impressive as it tastes, all while being surprisingly simple to prepare.

Why These York Peppermint Patty Cookies Are a Must-Try
What makes these Chocolate Mint Cookies truly exceptional is their simplicity and the ingenious use of York peppermint patties. You don’t need any special extracts or artificial flavorings to achieve that unmistakable minty fresh taste. The secret lies entirely within the iconic York peppermint patties themselves, which melt just enough to create a creamy, minty core without losing their shape or overpowering the rich chocolate cookie. This brilliant hack simplifies the baking process immensely, ensuring a consistent and delightful mint flavor in every single bite. If you’re a fan of York peppermint patties, prepare to fall in love with them all over again, nestled within a warm, freshly baked cookie.
The process couldn’t be easier: you simply encase a peppermint patty within a generous scoop of chocolate cookie dough, then bake. As the cookies bake, the peppermint patty warms up, becoming wonderfully soft and gooey, creating a truly irresistible molten mint center. The best part? These patties hold their integrity, providing a distinct burst of cool peppermint that perfectly complements the rich, fudgy chocolate cookie surrounding it. It’s a harmonious symphony of textures and flavors that will have everyone reaching for a second, or even third, cookie.

Essential Ingredients for Your Perfect Chocolate Mint Cookies
Creating these delectable chocolate mint cookies requires a few pantry staples and, of course, the star ingredient. Here’s a detailed look at what you’ll need and why each component is crucial for achieving that perfect soft and chewy texture with an amazing minty kick:
- 1 ¼ cup unsalted butter, softened to room temperature: Butter is the foundation of any good cookie. Using unsalted butter allows you to control the salt content in your recipe. Ensuring it’s at room temperature is absolutely critical. Softened butter creams beautifully with sugar, creating a light, airy base that contributes to the cookies’ tender crumb and helps them spread just right.
- 2 cups granulated sugar: Sugar not only sweetens the cookies but also plays a vital role in their texture. It helps to keep them moist and chewy, and when creamed with butter, it incorporates air, leading to a lighter cookie.
- 2 large eggs: Eggs act as a binder, holding all the ingredients together. They add moisture, richness, and help with the structure and chewiness of the cookies. Using large eggs is standard for most baking recipes.
- 2 tsp pure vanilla extract: Vanilla extract enhances the overall flavor profile of the chocolate, adding depth and a comforting aroma. Always opt for pure vanilla for the best taste.
- 2 cups all-purpose flour: Flour provides the main structure for the cookies. Ensure you measure it correctly, ideally by weight or by spooning it into the measuring cup and leveling off, to avoid dense or dry cookies.
- ¾ cup unsweetened cocoa powder: This is where the rich chocolate flavor comes from. For a truly decadent chocolate mint cookie, use a high-quality unsweetened cocoa powder. Dutch-processed cocoa can yield a darker color and milder flavor, while natural cocoa is fruitier.
- 1 tsp baking soda: Baking soda is a leavening agent that helps the cookies rise slightly and contributes to their soft, chewy texture. It reacts with the acidic components in the cocoa powder to create air pockets.
- ½ tsp salt: Salt is essential for balancing the sweetness and enhancing the flavors of both the chocolate and the mint. Don’t skip it, even in sweet recipes!
- 36 York peppermint patties: The undeniable star of these mint chocolate cookies! These perfectly sized candies are key to the vibrant mint center. Make sure to use the standard-sized patties for the best dough-to-patty ratio.
Step-by-Step Guide: How to Make Irresistible Chocolate Mint Cookies
Ready to bake? Follow these simple instructions to create a batch of the most delicious chocolate mint cookies you’ve ever tasted. Precision and a little love will go a long way!
- Prepare Your Wet Ingredients: In a large mixing bowl, using an electric mixer, cream together the softened butter and granulated sugar. Beat them on medium-high speed for about 2-3 minutes until the mixture is light, fluffy, and pale in color. This creaming process is crucial as it incorporates air, which contributes to the cookies’ final texture.
- Incorporate Eggs and Vanilla: Reduce the mixer speed to low. Add the eggs one at a time, beating well after each addition until fully incorporated. Then, stir in the vanilla extract. Continue to beat the mixture for another minute or two, ensuring everything is well combined and smooth.
- Combine Dry Ingredients: In a separate, medium-sized bowl, whisk together the all-purpose flour, unsweetened cocoa powder, baking soda, and salt. Make sure there are no lumps and the ingredients are evenly distributed.
- Gently Mix Dry into Wet: Gradually add the dry flour mixture to the butter and sugar mixture, mixing on low speed until *just* combined. Be careful not to overmix, as this can develop the gluten in the flour too much, leading to tough cookies. Stop mixing as soon as you no longer see streaks of dry ingredients.
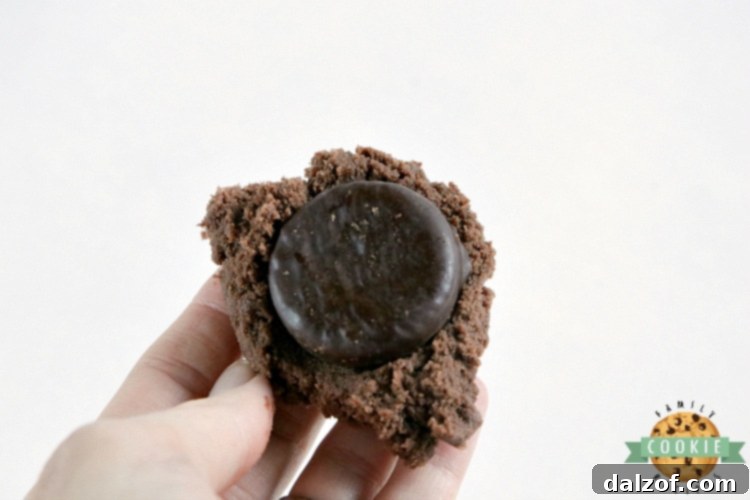
- Shape the Cookies: Use a standard cookie scoop (approximately 1.5 tablespoons) to portion out individual amounts of dough. Take a scoop of dough, flatten it slightly in your palm, then place a York peppermint patty directly in the center. Carefully mold the cookie dough around the peppermint patty, using your fingers to completely enclose it, ensuring no part of the patty is exposed. Roll it gently into a neat ball.
- Bake to Perfection: Place the dough balls onto a baking sheet lined with parchment paper, leaving about 2 inches between each cookie. Bake in a preheated oven at 350°F (175°C) for 8-9 minutes. The cookies may still look slightly underbaked in the center, but this is exactly what you want for that soft, chewy texture. They will continue to set as they cool.
- Cool and Enjoy: Once out of the oven, let the cookies cool on the baking sheets for at least 5-6 minutes. This crucial step allows them to firm up and prevents them from breaking when transferred. After this initial cooling period, carefully transfer them to a wire rack to cool completely. The warm, gooey mint center is best enjoyed when the cookies are still slightly warm!


Chocolate Mint Cookies Recipe
Rating: 5 out of 5 stars based on 5 votes
Print Recipe |
Pin Recipe |
Rate This Recipe
Course: Cookies | Cuisine: American | Prep Time: 10 minutes | Cook Time: 8 minutes | Servings: 36 cookies | Author: Jessica & Nellie
Ingredients
- 1 1/4 cup butter, softened to room temperature
- 2 cups sugar
- 2 eggs
- 2 tsp vanilla extract
- 2 cups flour
- 3/4 cup cocoa
- 1 tsp baking soda
- 1/2 tsp. salt
- 36 York peppermint patties
Instructions
- In a mixing bowl, cream the butter and sugar together for about 2-3 minutes.
- Add eggs and vanilla and continue to beat the mixture for a few more minutes.
- In a separate bowl, combine the flour, cocoa, baking soda and salt. Add the dry mixture to the butter mixture and mix just until combined.
- Use a cookie scoop to scoop out a tablespoon of the dough and then press a peppermint patty into the center, using your fingers to shape the dough all the way around the peppermint patty. Bake at 350°F (175°C) for 8-9 minutes. Cool on baking sheets for at least 5-6 minutes and then carefully transfer to a wire rack to cool completely.
Tried this recipe? Mention @familycookierecipes or tag #familycookierecipes!

Expert Tips for Baking the Best Chocolate Mint Cookies
Achieving bakery-quality chocolate mint cookies at home is easier than you think, especially with these insider tips. Following these guidelines will ensure your cookies are perfectly soft, chewy, and utterly delicious every single time:
- Ensure Proper Dough Consistency: The flour content is crucial for the dough’s texture. If your cookie dough feels too sticky after combining all ingredients, it likely needs a touch more flour. Add it gradually, a tablespoon at a time, until the dough is manageable and no longer excessively tacky. This prevents the cookies from spreading too much and ensures they hold their shape around the peppermint patty.
- Master the Butter Temperature: This cannot be stressed enough – *do not use melted butter*! Butter needs to be softened to room temperature, which means it should be pliable enough to leave an indentation when pressed, but not greasy or liquid. Melted butter will dramatically alter the cookie’s texture, leading to flatter, greasier, and less chewy results. Proper room temperature butter is key for successful creaming and a tender crumb.
- Cream Butter and Sugar Thoroughly: Dedicate adequate time to creaming the butter and sugars together. This step, typically lasting 2-3 minutes at medium-high speed, is where air is incorporated into the mixture. This aeration process creates a lighter, fluffier cookie dough base, resulting in cookies with an improved, melt-in-your-mouth consistency and a better overall rise.
- Always Preheat Your Oven: A properly preheated oven is essential for consistent baking. Placing cookie dough into a cold or partially heated oven will affect how the cookies spread and bake, often leading to uneven cooking and undesirable textures. Allow your oven to fully reach the specified temperature before placing your cookie sheets inside.
- Invest in a Cookie Scoop: For uniform cookies, a cookie scoop is your best friend. Not only does it make portioning dough incredibly quick and easy, but it also ensures that all your chocolate mint cookies are the same size and shape. This leads to even baking, meaning no burnt edges or raw centers, and a more professional presentation.
- Utilize Parchment Paper or Silicone Mats: Line your baking sheets with either parchment paper or a silicone baking mat. This simple step is a game-changer for easy removal. Cookies will glide off the pan effortlessly, eliminating the need for scraping and preventing them from sticking, ensuring every single cookie comes off in perfect shape. Plus, it makes cleanup a breeze!
- Avoid Overbaking for Ultimate Chewiness: This is perhaps the most important tip for soft and chewy cookies. When you take your chocolate mint cookies out of the oven, they should still look slightly underbaked in the center, perhaps even a bit glossy. They will continue to bake and firm up on the hot baking sheet for several minutes after removal. Overbaking will result in dry, hard cookies, so err on the side of caution!
Troubleshooting Common Cookie Baking Issues
Even seasoned bakers encounter challenges. Here are solutions to common cookie problems you might face with your chocolate mint cookies:
- Cookies Spreading Too Much: This often happens if your butter was too warm, you didn’t add enough flour, or your oven temperature isn’t accurate (too low). Ensure butter is perfectly room temperature, try adding a tablespoon or two more flour, and check your oven with a thermometer. Chilling the dough for 30 minutes can also help.
- Cookies Too Dry/Crumbly: Overmixing the dough develops too much gluten, making cookies tough. Also, too much flour or overbaking can dry them out. Measure flour precisely and avoid mixing past the point where ingredients are just combined.
- Peppermint Patties Melding/Disappearing: If your patties disappear, the dough might be too thin or too warm. Make sure the dough completely encases the patty and is rolled into a tight ball. You can also chill the formed cookie dough balls for 15-20 minutes before baking to help the patties hold their structure.
- Cookies Not Chewy Enough: This is typically a sign of overbaking. Remember to remove them from the oven when they still look slightly underdone in the center.

Mastering the Art of Softening Butter to Room Temperature
Achieving perfectly softened butter is a critical step for many baking recipes, especially for these chewy chocolate mint cookies. It’s the secret to a smooth, creamy dough and ultimately, a tender cookie. While simply leaving it out on the counter for a few hours is ideal, life often calls for quicker solutions. Here’s how to get your butter just right, even when you’re short on time:
The Microwave Method (Use with Caution!)
This is the fastest method, but it requires vigilance to avoid accidentally melting the butter, which will detrimentally affect your cookie texture.
- Place a whole stick of butter (unwrapped from foil) in the microwave.
- Microwave on HIGH for approximately 6-7 seconds.
- Check the butter by gently pressing it. It should yield slightly but still hold its shape.
- If it’s still very firm, microwave for another 5-7 seconds. Repeat in shorter intervals (2-3 seconds) if it’s nearing softness to prevent melting. The goal is pliable, not liquid.
Pro Tip: Use the Defrost Setting! Many bakers find the defrost setting on their microwave to be more forgiving. While it takes a bit longer (closer to 30 seconds to a minute), it heats the butter more gently and evenly, significantly reducing the risk of melting. It’s an excellent option for achieving that perfect softness without the stress.
Alternative Softening Methods:
- The Warm Water Bath: Fill a bowl with warm (not hot!) water. Place the unwrapped stick of butter in a ziplock bag or a separate, smaller bowl and submerge it in the warm water for about 5-10 minutes. Check for softness, replacing the water if it cools too much.
- The Grating Method: If you’re really pressed for time and don’t want to use the microwave, you can grate cold butter using a box grater. The smaller pieces will come to room temperature much faster. This method works well for recipes where you’re incorporating butter directly into dry ingredients.
- Pounding Method: Place cold butter between two sheets of parchment paper and gently pound it with a rolling pin. This flattens and softens it quickly.
No matter which method you choose, the key is to ensure the butter is uniformly soft throughout, without any melted spots, to achieve the ideal dough consistency for your chocolate mint cookies.
Variations and Customizations for Your Chocolate Mint Cookies
While the classic York peppermint patty center is undeniably delicious, these chocolate mint cookies are also wonderfully adaptable. Feel free to experiment and make them your own!
- Mint Chocolate Chip Twist: For an extra minty crunch, try adding ½ cup of Andes mint chocolate chips or regular mint chocolate chips to the cookie dough along with the flour mixture. This provides an additional layer of mint flavor and delightful texture.
- Dark Chocolate Indulgence: Swap out some of the unsweetened cocoa powder for dark cocoa powder, or use a higher quality dark chocolate for an even deeper, more intense chocolate flavor that beautifully contrasts with the sweet mint.
- White Chocolate Drizzle: Once the cookies are cooled, melt some white chocolate chips and drizzle them over the tops for an elegant finish and an additional layer of sweetness.
- Holiday Sprinkles: For festive occasions, press some green or red sprinkles onto the top of the dough balls before baking. This adds a pop of color and makes them perfect for Christmas or St. Patrick’s Day.
- Different Mint Candies: If York patties aren’t available, or you prefer a different mint candy, consider using Junior Mints (though they are smaller and may melt differently) or even a square of an Andes mint chocolate bar in the center.
Storage and Serving Suggestions
Once baked, these chocolate mint cookies are hard to resist! Here’s how to store them and some ideas for enjoying them:
- Storage: Store the cooled cookies in an airtight container at room temperature for up to 3-4 days. For longer storage, you can freeze them for up to 2-3 months. Thaw at room temperature before serving.
- Reheating: For that ultimate gooey mint center experience, warm a cookie in the microwave for 10-15 seconds before eating. It brings out the freshness and melts the patty beautifully.
- Serving Ideas: Enjoy these cookies with a cold glass of milk, a hot cup of coffee or tea, or even alongside a scoop of vanilla bean ice cream for an extra decadent dessert. They make fantastic additions to cookie platters for parties and holidays.

Indeed, Chocolate Mint Cookies are the epitome of soft and chewy goodness, with a delightful secret: a smooth York peppermint patty hidden inside. This easy cookie recipe truly achieves the perfect harmony of rich chocolate and cool, invigorating mint, making every bite a memorable one. Whether you’re a seasoned baker or just starting out, this recipe promises delicious results and an impressive treat.


A Sweet Story from Our Family Kitchen
In our bustling household, life is often an exciting blend of chaos and joy. With four wonderful girls and one special boy, the dynamics are always interesting. I remember when our youngest, our precious baby girl, was on the way. My son, C, was quite set on having a brother and, to be honest, was a little disappointed when he learned another sister was joining the ranks. Those first couple of months were a bit challenging as he adjusted to the idea, but as time went on, our little girl, B, began to work her magic.
Now, B is ten months old, and C has transformed into the most fabulous big brother a little sister could ask for. He’s incredibly sweet and gentle with her, and he possesses a unique talent for making her laugh—a skill that none of the rest of us can quite match! She absolutely adores him, her eyes lighting up whenever he enters the room. Even though she’s now fully mobile and rarely sits still for long, she still grants him those quick, precious little cuddles, a testament to how much she cherishes him.
It fills my heart with so much warmth to see their bond grow. My hope is that these two will always remain close, and that B will one day truly appreciate how incredibly lucky she is to have such an amazing big brother. Moments like these, filled with family and homemade cookies, are truly what make life sweet.